Hello! Meg here! I love decorating for the holidays, and Halloween is one of my most favorites! Crafting is truly one of my passions, and I am so excited to begin sharing with all of you some of the fun I have here on The Kusi Life! One of my most favorite things about DIY and crafting is that I can custom make pretty much anything to fit my decor needs.
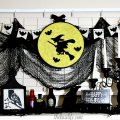
Lets just be honest for a second here. Isn’t it so much fun being able to make something and display it in your home and be able to tell everyone you made it yourself? Well, I have a fairly easy tutorial for you today that will be a beautiful addition to your Halloween decorations. I know you will love having this Halloween Boo Bunting for your home! Some people don’t love crafting as much as I do, so if you are one of those people, don’t worry because I’ve got you covered! I can make you your very own Halloween Boo Bunting and get it shipped out to you to enjoy during the month of October! You can place an order by sending me a message on my Sew Beyond Beautiful Facebook Page , the cost is $20 plus shipping.
Let’s get started!

Materials needed:
¼ yd orange fabric (or color of choice)
¼ yd black felt
Rotary cutter with pinking blade
1 sheet card stock, color of choice (this is for the ovals to put the letters on)
About 2 yd black 1 ½” wide ribbon (I like it with wire)
1 ¼ yd Trim for around letters, any width you would like
¼ yd trim for bottom corner, any width
Glue gun and glue sticks
Black Vinyl (for the letters)
Cricut Machine
*optional – Embellishments (I’ve used some fun Halloween confetti)
First draw your triangle on a piece of paper. As you can see I made my top 8” across then took those two edges down to the middle.

Then you will cut the fabric with the rotary cutter. I like to lay the pattern piece onto the fabric then use my ruler on the edge to guide the rotary cutter to make a straight line.

After cutting all three triangles I lay them onto the black felt and cut, using my ruler, 1/8” from orange edge.

Then you can hot glue the orange to the black or sew it. I like to sew it on because I like the look with the stitch on it. Also I just sew the two lower edges, not the top. You can choose what you like.

*Plug in your glue gun here* Now I cut my ovals on my Cricut with the George Basic Shapes cartridge at 5” and I cut my letters with the Storybook cartridge at 3 ½”.

Now stick your vinyl letters on your ovals, in the middle as best you can. Then hot glue that oval about 1 ½” from the top and center in the middle of each side.

Glue trim around ovals.

Glue other trim about 2” below oval.

Then leaving about 1” between the next letter “O” do the same, pinching and gluing to each corner and again to the last triangle. Then measure 10” from that last corner and cut your ribbon.

Now glue your buttons to each pinched corner and add embellishments if you would like. I left the embellishments off this one but I have done some with them and they turn out cute.*These little skull confetti are better to be glued on with super glue rather than hot glue.


And there you have it! A fun addition to all your Halloween decor, AND you can say you made it yourself!
See the Happy!